
(learn more about Poynterra Trekker and download)
Imagine you’re going abroad for vacation and will be spending a few days in Copenhagen, Denmark. You’d like to see as many of the top sights as possible, so you type “top places to see in Copenhagen” into the search bar. Plenty of lists pop up, with the usual trip and vacation sites at the top. Other than click on items to see whether they’d be worth your while, what can you really do with all this information? If sights look too good to pass up and you’re organized and “tech savvy,” you might save website links to a note saver app. If you’re old-school, you might print them out and put them in a manila folder. In any case, it will take considerable effort to put information and map locations into a form suitable for sightseeing. And if you put it all on your smartphone, you’ll have the constant battle of map navigation sucking down battery life … that’s assuming you have an affordable international data plan!
Wouldn’t it be convenient if all this info could magically appear in an organized, easy-to-use, power-saving app as Sights of Copenhagen, just by clicking or scanning a QR code? Well, with Poynterra Trekker, that’s become a reality! When internet is available, scanning a Poynterra QR Code initiates download and installation of a unique Poynterra Collection — a cataloged, curated set of waypoints (locations) that installs as a folder in the app. You can see the beginnings of the catalog in the app at Menu>Collections. Going forward, catalogs from other content creators will also begin to appear. Our hope is that Poynterra Trekker will eventually become the platform for displaying and managing navigation waypoint lists, with Poynterra QR Codes appearing on websites, printed literature, trailheads, etc. If you’re interesting in hosting your own Poynterra Collections, please contact us at info@mindsparkinc.com.
For now, we’ll show you how to easily create a Sights of Copenhagen folder yourself. Within Poynterra Trekker, you could just go to Folder Menu>Add New Folder, create the folder, and make it the default. You could then add sights one by one with the Add Waypoint button, using the GeoSearch feature to find waypoint (location) coordinates.
But there’s a much more efficient way to do this: using powerful mapping tools from Google that can create a KML file for the sights (waypoints) you want to visit, which Poynterra Trekker can then import as a new folder. Both Google My Maps and Google Earth are great for this. Google My Maps is simpler, but it can only display simple street maps, and its search function is very basic. Google Earth, on the other hand, can show a multitude of information layers and has a powerful, intuitive user interface. Its search function can also support most of your research needs, without having to leave the Google Earth window. So that’s what we’ll use in this tutorial. But be sure to try Google My Maps as well — you might even prefer its simplicity for your particular needs.
Step #1: Set up a Project in Google Earth
Open Google Earth, preferably on your laptop or desktop, and make sure you’re signed in with your Google account. Tap on Projects in the main menu and then New project>Create project in Google Drive. Change Untitled Project to Sights of Copenhagen, which will become the name of your folder in Poynterra Trekker. You can also Add a description here, which will appear as folder info in the app.
Step #2: Use Search to find places (waypoints) you want to add to the Project
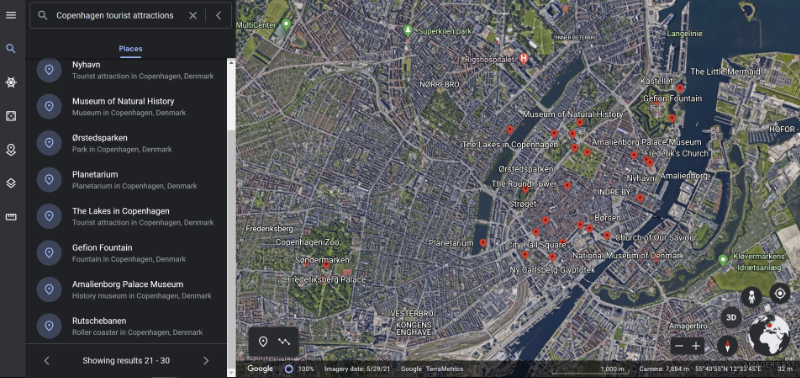
Tap Search, type “Copenhagen tourist attractions” and ENTER. Results 1-10 will appear. Scroll to the bottom and tap Next to show Results 11-20. Tap again to show 21-30. To the right, you can see that 30 waypoint markers have appeared on the map. Zoom the map so that the markers fill the screen, which should now look like this:
Now that you have lots of possible places to visit right on the screen, start tapping the red waypoint markers to see popups of expanded information, or just tap each item on the list. If a waypoint looks like it’s worth adding to Sights of Copenhagen, copy any informative text you might want to appear in Poynterra Trekker. Then tap Add to project on the popup.
After saving to Sights of Copenhagen, a panel for the added waypoint pops up. Tap the button marked Replace and paste the text that you just copied. Don’t do anything else on the panel. Finally, tap the back arrow and you’ll see that the waypoint is now on the project list.
Tap the Search icon on the main menu and you’ll return to the list of 30 sights. Pick another item, and then another … until you’ve completed your list.
Step #3: Create and save a KML file for the Project
When all the waypoints you want to visit have been saved, tap the Projects icon on the main menu at the left. Select Sights of Copenhagen. You’ll see all the waypoints you’ve added. At the top right corner of the panel, tap the three vertical dots and select Export as KML file. Save the file somewhere that’s accessible from Poynterra Trekker (Google Drive is a perfect place).
Step #4: Open Poynterra Trekker and import Sights of Copenhagen.kml
You’re almost done. All you need to do now is open Poynterra Trekker on your device and then tap Menu>Import. Navigate to where you’ve saved Sights of Copenhagen.kml (Google Drive or elsewhere) and tap it. Follow the screen prompts, and moments later Sights of Copenhagen will appear in your Folder Menu!
Step #5: Go sightseeing in Copenhagen!
To use your new folder for sightseeing, take advantage of the fact that you still have wifi/internet to display a map of all the waypoints in your folder. Once created, it will be accessible even after you leave the hotel and have no internet. First long-press Sights of Copenhagen in the Folder Menu to make it the default. Then tap the map icon (top left of navigation circle) and select Show all folder waypoints.
After the map appears, you can start sightseeing — even in airplane mode for maximum battery saving if you want! Select your first destination by tapping the icon at the top right of the center circle. Note that on the destination selector, you can easily show distances from your current location, making it easy to decide what to see first. Be sure to use HelpTool™ to quickly learn about any of Poynterra Trekker’s many features!
Finally, for lunch, I highly recommend pickled herring with akvavit in Nyhavn …